In this step, we’re just going to draw the ball, paddles, and a message, just to get an idea of what the game will look like later.
Making a window
Open up your favorite editor (preferably with basic support for Python) and create a new file called something like pong.py. The first thing to do is add the necessary imports. We’re going to be using Tkinter, Python’s default GUI framework, to draw everything. While it may not be considered the best framework out there, it doesn’t require any downloads and is relatively easy to use.
Tkinter can be accessed via a module named tkinter, but it’s an idiom to import it as tk, which is easier to type.
import tkinter as tk
To create the window that everything will be drawn on, we will create an instance of the Tk class in the tkinter module.
root = tk.Tk()
Here, root is the main part of the application, and all the other shapes, labels, buttons, etc. (called “widgets”) will be added to root (directly or indirectly).
To set the title, we can use the title method:
root.title("Pong")
Also add this code at the bottom of your file and run it.
root.update()
tk.mainloop()
How this last part works
`root.update()` does exactly what you think it does - it updates the root with all the changes we've made so far (setting the title to "Pong", in this case). `tk.mainloop()` is a handy function that basically runs an infinite loop. This means that the window stays open until you close it manually. Try removing the call to `tk.mainloop()` and see what happens.A small window looking something like this should appear.

Drawing a canvas
Now we’ll need a canvas to draw the paddles and the ball on. For that, you’ll have to create a Canvas object. Insert the code below before the last couple lines (root.update() and tk.mainloop()). Remember, without root.update() after creating the canvas, the window won’t actually be updated, and the canvas won’t appear. Also, tk.mainloop() runs in an infinite loop and blocks your program, so you should put it at the very bottom of the file, because any code after it will never be executed.
canvas = tk.Canvas(
    root,
    width=700,
    height=650,
)

canvas.pack()
This creates a canvas whose master is root with the specified width and height, and canvas.pack() adds that canvas to the window. Try running your program again. This time, a white square (bigger than the window last time) should appear.
Why are the width and height different if the canvas should be a square?
Tkinter uses text units by default instead of pixels for width, height, etc. Therefore, the canvas above is not 700 pixels high and 700 pixels long, it is 650 letters high and 700 letters wide. You can change it according to your own computer's screen and your preferences.

You can customize this canvas as you want. Try setting and playing around with the width, height, background color (with bg or background), border width (with bd or borderwidth), relief (with relief), and other options. Here is a list of the options you can pass in (it’s for a different function, but it should work for the Canvas constructor too).
This is how I modified my canvas:
canvas = tk.Canvas(
    root,
    width=400,
    height=300,
    # Default borderwidth is 0 (no border)
    bd=20,
    # You can use color names like 'orange', RGB, or hex. See https://www.tutorialspoint.com/python/tk_colors.htm
    bg="red",
    #You can also use tk.FLAT(default), tk.SUNKEN, tk.RAISED, tk.RIDGE
    relief=tk.GROOVE
)
It looks like this:

It doesn’t look that great, so I think I’ll just go back to that first canvas, but with a black background (using bg='black'). You can tweak the settings if the game doesn’t work properly on your computer, e.g. the width and height of the canvas will need to be set differently depending on your computer.
We’re going to need to know the canvas’s width and height later, so let’s store them in two variables.
canvas_width = 700
canvas_height = 700

canvas = tk.Canvas(
    root,
    width=canvas_width,
    height=canvas_height,
    bg="black",
)
Making labels to display messages
Now let’s put in a label that we can use later to declare the winner at the end of the game. Labels are Tkinter widgets used to display text or images. Right now, we’ll just have it display the text “Hello world.”
label_text = tk.StringVar()
label_text.set("Hello world")
label = tk.Label(
    root,
    textvariable=label_text,
    bg="black",
    fg="white",
    font=("Courier", 30),
)
label.place_configure(x=350, y=325, anchor="center")
Let’s take this step by step. The label_text variable will hold the text of our label. You can change the text by using label_text.set, as I’ve done above, and get it with label_text.get() (which we probably won’t use).
After that, the actual label, which is a tk.Label object, has to be created. I’ve set the background to black to “blend in” with the rest of the canvas. As you probably guessed, fg sets the foreground color. The font parameter takes a tuple containing the font family (you can also try “Helvetica” or “Times”) and the font size. The textvariable parameter takes a StringVar and is used when the text of the label can change. If the text is not going to change, you can use the text parameter and just do text="Hello World" while calling the Label constructor.
label.place_configure adds the label to the window and sets the position of the label. I used 350 because it’s half of 700, the canvas width. Doing anchor="center" means that the given x and y coordinates are where the center of the label will be. This is the result:

Hard coding the label’s position isn’t nice, though. What if you make the canvas thinner or wider so that the label is no longer centered? The x-coordinate of the label, at least, should be dependent on the width of the canvas. Let’s calculate x_center and y_center, which make up the position of the center of the canvas.
x_center = canvas_width / 2
y_center = canvas_height / 2
Now we can use x_center and y_center while setting the label’s position. Try changing the width and height of the canvas. You’ll notice now that the “Hello World” label always stays in the center.
label.place_configure(x=x_center, y=y_center, anchor="center")
Again, try messing with the colors, size, etc. See what happens when the background and foreground of the label are the same and find a color combination you like.
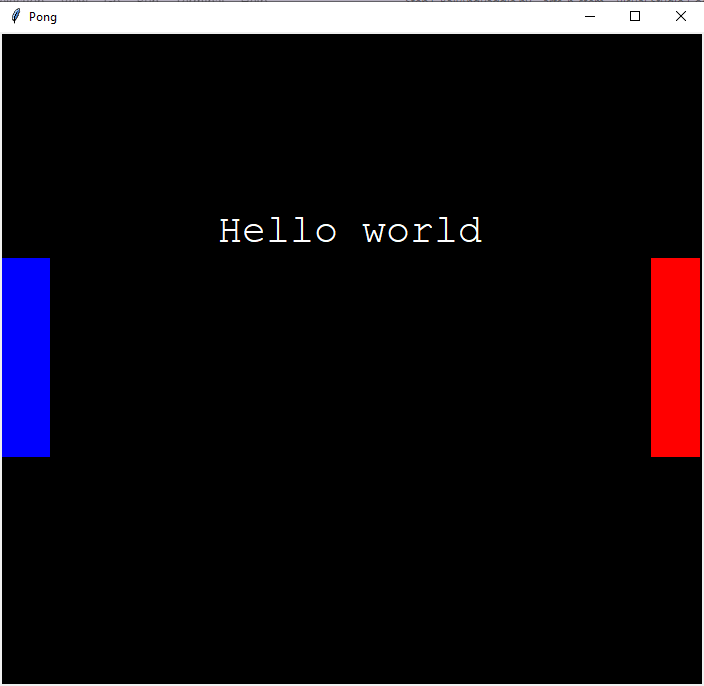
Drawing the paddles
Now for the paddles. We want 2 paddles on either side, colored differently (I’m going to pick blue and red), so it should look like this (let’s keep the “Hello world” label as is for now):
We can use the create_rectangle function on our canvas to create these paddles. First, though, let’s define 2 variables representing the paddles’ height and width.
paddle_height = 200
paddle_width = 30
To create a rectangle, you need to give tkinter the coordinates of its top left corner and its bottom right corner. If you don’t know how the coordinates system works in computer graphics, see this about how they work.
Let’s start with the x-coordinates, which are easier to find. The left edge of the left paddle is at x = 0 because it’s right on the border. We know the right edge is 30 (or whatever paddle_width is) text units from the left edge. To find the x-coordinate of the right edge of the left paddle, you just need to add the paddle width (x = 0 + paddle_width = paddle_width).
We know the right edge of the right paddle is also on the right edge of the canvas, which is canvas_width units from the left edge of the canvas. The x-coordinate of the left edge of the canvas is 0, the x-coordinate of both the right edge of the canvas and the right edge of the right paddle is canvas_width.
The y-coordinates of the 2 paddles will stay the same, since they’ll move up and down to hit the ball. However, they both start off at the center, so we can use that to calculate their initial positions. This diagram can help determine what the y-coordinates should be:

The yellow line goes through the middle of the paddle and the canvas, since the paddles start out centered on the board. From this beautiful handmade diagram, you can see that the top edge of the paddles is paddle_height / 2 units above the yellow center line, and the bottom edge is paddle_height / 2 units below it. The y position of that center line is y_center (which we calculated earlier), which means the top edge is at y_center - paddle_height / 2 and the bottom edge is at y_center + paddle_height / 2.
Now that we know everything there is to know about the paddles, let’s draw them:
left_paddle_id = canvas.create_rectangle(
    0,                            #x1
    y_center - paddle_height / 2, #y1
    0 + paddle_width,             #x2
    y_center + paddle_height / 2, #y2
    fill='blue',
)

right_paddle_id = canvas.create_rectangle(
    canvas_width - paddle_width,
    y_center - paddle_height / 2,
    canvas_width,
    y_center + paddle_height / 2,
    fill='red',
)
The create_rectangle method returns an id so that we can move our paddles later on. Later on, if we want to move one of the paddles or change it somehow, we can provide that id to a function, e.g., canvas.move.
Try running the program again, and you should get a canvas looking like the image above (don’t forget root.update).
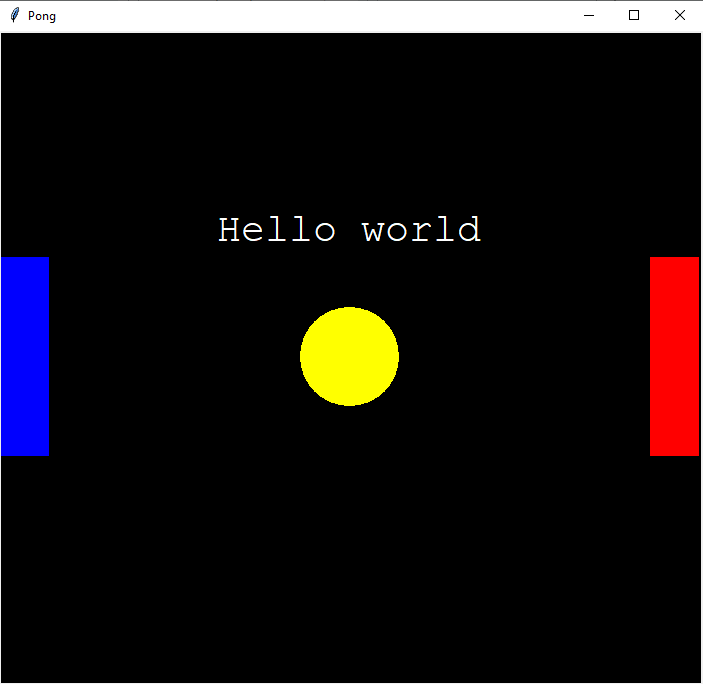
Drawing the ball
Now for drawing the ball. Let’s first define a variable for the ball’s radius, because we’ll want to reuse it later.
ball_radius = 50
Here’s another diagram, this time of the ball. The dot in the center represents the center of the ball, with coordinates (x_center, y_center). The blue dot on the line on the left is to mark the x-position of the leftmost part of the circle, the one on the top is to mark the y-position of the topmost part of the circle, and so on.

We need to know to use the create_oval, you need to give the coordinates of a hypothetical rectangle going around your oval (or circle, in this case).
ball_id = canvas.create_oval(
    x_center - ball_radius,
    y_center - ball_radius,
    x_center + ball_radius,
    y_center + ball_radius,
    fill="yellow",
)
These arguments are calculated the same way create_rectangle did earlier, when we created the paddles. Each dot is ball_radius units away from the center, so the left dot is at x = x_center - ball_radius, the top dot is at y = y_center - ball_radius, and so on.
Run the file, making sure to add root.update() after you create the ball. The result will look something like this (if the “Hello world” label is blocking the ball, you can move it out of the way):
Next step: Creating classes to represent objects
The source code for this part is here.